
Navigate to Classes
Where to find this: Sidebar › Classes
From the sidebar, click Classes. This is your home base for managing all your courses. You'll see any existing classes here, along with a button to create a new one.

Lemon says: Welcome! Setting up a class is the first step to getting your students practicing. It only takes a few minutes — let's get started!
Create a new class
Click Add Class to open the creation form. You'll need a few details about your course.
- Course Code — a short identifier (e.g. "SPAN-201")
- Class Title — the display name students will see (e.g. "Intermediate Spanish")
- Class Color — a colour to distinguish this class at a glance
- Institution — your school, or Independent if the class isn't tied to one
- Term — an existing academic term, or a custom one with start and end dates
Lemon says: Pick a clear class title! Your students will see this when they join, so make it easy to recognise.
Add sections
If you teach multiple sections of the same course, tick "I have multiple class sections" in the creation form and enter your section codes separated by commas (e.g. "001, 002, 003"). If you only have one group, a default section is created for you automatically.
- Sections let you assign activities with different dates per group
- Each section has its own roster of enrolled students
- Co-instructors can be added to individual sections to help manage them
Lemon says: Don't worry if you only have one section — the system creates one for you. Sections matter once you're juggling several groups.
Invite people
Open your class and go to the People tab, then click Add People. You can add both students and co-instructors — switch the role toggle at the top of the form.
- Add students by entering email addresses or uploading a CSV roster
- Add co-instructors, who can manage the section you add them to — its roster, assignments, and student work
- CSV upload is best for large classes — export from your LMS and drop it in
- New invitees receive an email to sign up; people who already have an account are added straight away
- Track registration status to see who has accepted and who is still pending
- Students need access to practice. If your Dashboard offers Request Free Student Access, use it (approval required), or rely on your institution's license. Students without access are still enrolled but need payment or institution coverage
Lemon says: Keep an eye on the invitation badges — amber means they haven't accepted yet, red means the invite expired.
Explore your class workspace
Click into your class to open the Class Workspace — your command centre for this course. If the class has multiple sections, use the section dropdown to switch between them; each section has its own assignments, dates, and roster.
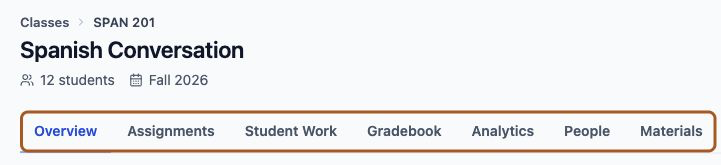
- Overview — a snapshot of class stats at a glance
- Assignments — which activities are assigned to which sections
- Student Work — completion status and individual submissions per assignment
- Gradebook — every student against every assignment in one grid
- Analytics — class-wide performance and proficiency trends
- People — your roster and individual student progress
- Materials — syllabi, vocabulary lists, and readings that inform AI generation
Lemon says: Upload your syllabus to Materials early, then attach it when you create an activity with AI. The activity will match your course better.
What to do next
With a class in place, the next step is an activity for students to practice with. If you're new to the format, the fastest route to something good is to copy an activity from the Library and adapt it rather than starting from a blank page.
- Read "Creating Your First Activity" for a full pass through the editor
- Read "Writing a Scenario That Fills the Time" before you write your first scene
- Run the activity yourself with Try before assigning it to anyone
Lemon says: You're all set! Once your students have access, your class is ready whenever you are.